Charts
Alphabet Chart
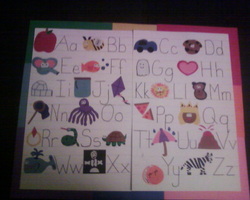
This is an Alphabet Chart that I made for my daughter, It has all original pictures made out of construction paper and done on poster board. The pictures that I made: Apple, Bee, Car, Dog, Elephant, Fish, Ghost, Heart, Igloo, Jar, Kite, Lion, Monkey, Net, Octopus, Pizza, Queen, Ring, Snake, Turtle, Umbrella, Volcano, Whale, X-Ray, Yo-Yo, Zebra.
Shapes Chart
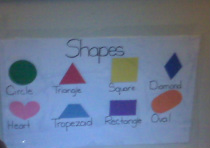
I also made a shapes chart for my daughter, so she can see the shapes through out the day with the names of them underneath. I cut out shapes and put them on a piece of poster board and in Manuscript Writing I wrote the names of the shapes underneath the shapes. (pictures will be up shortly) Thank you.
Weather Chart
Age: 3-5 Years Old
Activity: What is the weather today?
Developmental Goals:
Learning Objective:
When asked what the weather outside is like the child will describe, and relate the weather to the pictures, then place them on the chart.
Motivation:
Ask the child "What do you see when you look outside today?" "How is the weather different then yesterday?"
Procedure:
Questions to Guide Learning:
1. What do you wear when it snows outside?
2. What do you wear outside when it rains?
3. What do you like to do when its sunny outside?
4. What makes winter different from summer?
5. What makes fall different then spring?
Activity: What is the weather today?
Developmental Goals:
- To develop understanding of season changes
- To develop environmental awareness
- To promote participation skills
- To enhance weather vocabulary
Learning Objective:
When asked what the weather outside is like the child will describe, and relate the weather to the pictures, then place them on the chart.
Motivation:
Ask the child "What do you see when you look outside today?" "How is the weather different then yesterday?"
Procedure:
- Have the chart hanging on the wall or laying on the floor where the child can easily see it.
- For example: Hold a picture up and ask "What does this look like?" And respond, "Yes this is the sun, do you see the sun outside today?"
- As you go through each picture, hang the appropriate pictures in the right spot on the chart.
- After the child gets familiar with the pictures and has done this activity before you can change it up by asking "What does the weather look like outside" And based on their responses hang the appropriate pictures on the board.
Questions to Guide Learning:
1. What do you wear when it snows outside?
2. What do you wear outside when it rains?
3. What do you like to do when its sunny outside?
4. What makes winter different from summer?
5. What makes fall different then spring?
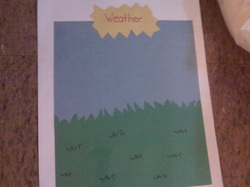
Weather Chart Materials:
Materials Needed:
- Blank weather board - With blue sky and green grass with a tree trunk
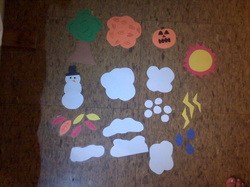
- Pictures of different weather (I made mine out of construction paper)
- Sun
- Clouds
- Rain Drops
- Lightning Blots
- Fall tree/ Winter tree/ Summer Tree
- Snow balls / or Snow Flakes
- Snow man
- Snow
Language Development
The Importance of Books
Children learn language and extend their vocabulary every day. There are many different ways to expose a child to new words and phrases. Have a book shelf in the living room. Having a sturdy bookshelf that the child can take books out of and hold onto will encourage language development. Letting the child access books at anytime during playtime is very stimulating. Board books and cloth books are great for toddlers that like to rip pages. Books come in all sizes and smaller books are great for smaller children. Getting them interested in books early exposes them to learn to love reading. Books cognitively stimulate the brain and language development process. They will be interested in books as they grow. Reading as much as possible to children is highly recommended, to help build vocabulary. Babies are supposed to hear thousands of words per day. Reading helps them hear words that normally wouldn’t be said on a daily basis.
Emma could sit for hours looking at books. Some books keep her interest more than others. She loves the book “Brown Bear Brown Bear What Do You See?” by Bill Martin Jr., illustrated by Eric Carle. Eric Carle illustrates all of his books using tissue paper making the pictures original and appealing to young children. His books are great for young children. Emma will stare at the pages, and listen when read too. A lot of books she likes to grab out of my hands and flip the pages. I do let her turn the page when I’m done reading it. The version of the book we have is a medium board book. Those are very durable and prefect size for a toddler to hold on to.
Emma could sit for hours looking at books. Some books keep her interest more than others. She loves the book “Brown Bear Brown Bear What Do You See?” by Bill Martin Jr., illustrated by Eric Carle. Eric Carle illustrates all of his books using tissue paper making the pictures original and appealing to young children. His books are great for young children. Emma will stare at the pages, and listen when read too. A lot of books she likes to grab out of my hands and flip the pages. I do let her turn the page when I’m done reading it. The version of the book we have is a medium board book. Those are very durable and prefect size for a toddler to hold on to.
Using Descriptive Words
Being descriptive when talking to baby builds a strong vocabulary. It also contributes to making sure the baby hears enough words per day. Words that describe help the child gain a better understanding of words. Using words that describe color, shape, and size are basic ways to use describing words. Examples: “Look at the red car, it’s driving really fast.” “The yellow balloon is big and round.” Using descriptive words is a good habit to get into when talking to children. It is also good to avoid using “baby talk”. Mumbling cute sounds although teaches baby to make sounds, it doesn’t teach them words.
Flashcards
Flashcards also help expose children to new words frequently. Use words you want them to learn and that are used around the house. Such as “Apple, Mom, Dad, Cat, Dog, Papa, Hi, Bye, Eyes, Nose, Ears, Toes, and so on” My Baby Can Read Program has the best flash cards I have ever used with children. There are many different opinions on this program. I personally love it. The cards are double sided, with a word on each side. They also have a pull out tab with a picture of the word. It gives the child a chance to see the word, hear the word, and see what the word is. The DVD’s are great as well. The DVD’s are simple with the words and real images. They show real children, babies, and animals. Nothing in My Baby Can Read is animated. Being narrated in both adult and child voices; it grabs the child’s attention. Whether you agree with using the TV or not, the flash cards are a great idea. Flashcards are easy to make. All that’s needed is index cards and a sharpie. Making them saves you money and is a good way to pick the words they are being taught first. Flashcards are a good way to stay active with your child’s language development while stimulating their development.
Activities
CHOO CHOO Train Activity Lesson Plan
Age: 2/3 Year Old
Activity: Choo Choo Trains
Theme: Transportation
Developmental Goals:
To develop space concepts
To enhance transportation vocabulary
To introduce color concepts
To promote gross motor skills and muscle development
Learning Objective:
When given the train the child will, climb in and out of the boxes and pretend they are driving a real train.
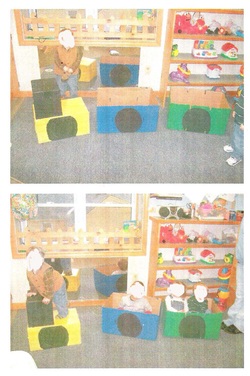
Materials Needed:
Boxes painted to look like a train
Whistle
Motivation / Introduction:
Ask the children if they have ever been on a train. “How we get to the store? Do we ride a train to the store? People ride on trains when they want to travel far away. If you were a train, where would you go?”
Procedure:
1. Have the children climb into the train and ask them what color the apart they are in is.
2. Once the children are inside the train have them pretend they are driving and make train sounds. CHOO CHOO!!!
3. Tell the children that the end is the caboose.
4. Show the children that the engine is in the front of the train.
Closure:
Blow a whistle like the train for them to move on the next activity, or just blow it for fun.
Questions to Guide Learning:
What color is the part of the train you’re in?
How does a train move from place to place?
What are different sounds a train makes?
What is the driver of a train called?
Activity: Choo Choo Trains
Theme: Transportation
Developmental Goals:
To develop space concepts
To enhance transportation vocabulary
To introduce color concepts
To promote gross motor skills and muscle development
Learning Objective:
When given the train the child will, climb in and out of the boxes and pretend they are driving a real train.
Materials Needed:
Boxes painted to look like a train
Whistle
Motivation / Introduction:
Ask the children if they have ever been on a train. “How we get to the store? Do we ride a train to the store? People ride on trains when they want to travel far away. If you were a train, where would you go?”
Procedure:
1. Have the children climb into the train and ask them what color the apart they are in is.
2. Once the children are inside the train have them pretend they are driving and make train sounds. CHOO CHOO!!!
3. Tell the children that the end is the caboose.
4. Show the children that the engine is in the front of the train.
Closure:
Blow a whistle like the train for them to move on the next activity, or just blow it for fun.
Questions to Guide Learning:
What color is the part of the train you’re in?
How does a train move from place to place?
What are different sounds a train makes?
What is the driver of a train called?
Hamster Food Snack Activity
Age: 3-4 years old
Activity: Hamster Food
Theme: Pets
Developmental Goals:
To promote fallowing directions
To promote self help skills
To enhance counting skills
To enhance one to one correspondence
Materials Needed:
Granola
M&M’s
Raisins
Pretzels
Chex Cereal
Plastic Bag for Each Child
Spoons
Motivation/Introduction:
Have the granola already made or bought.
8 cups rolled oats
4 cups shredded coconut
1 cup vegetable oil
1/3 cup honey
4 teaspoons cinnamon
Put all the ingredients that the children can add to their granola set out on the table and tell the children “Today we are going to be making our own snack using this recipe chart.”
Procedure:
1. Have the children take 1 cup of granola into a plastic bag.
2. Then have them count out 2 M&M’s into the plastic bag.
3. Then have the children put 3 Raisins in the plastic bag.
4. Have the children count out 4 Chex Cereal pieces.
5. Then have the children count out 5 pretzels and put them in to the bag.
Closure:
Have the children mix up their bag and then eat their hamster food.
Question to Guide Learning:
What do hamsters eat?
Would a hamster eat granola?
What kind of pets do you have at home?
Shape Memory Game
Age: 3-4 years old
Activity: Shape Memory
Developmental Goals:
To enhance shape recognition
To enhance memory skills
To recognize differences in shapes
To promote taking turns
Materials Needed:
Pairs of cards with matching shapes
Shape cut outs at different areas of the classroom
Motivation/Introduction:
Have a group of small children gather at the math center. Then show each of the cards to the children and ask them what shapes they see. Show one card at a time and ask them what shape is on the card. Tell them that we are going to play a memory game.
Procedure:
1. Put the cards face down on the table and mix them up. Let the children help mix up the cards with you.
2. Have one child flip over one card.
3. Ask the child what shape is on the card.
4. After they identified what the shape they flipped over is have them flip over another one and identify what shape that one is.
5. If the cards are a match they get to keep them.
6. Have then next child do the same.
Closure:
Put shapes that match the cards at each area that is open for the child to go to. Have the cards flipped over and then have each child pick one card. Have them identify the shape that they choose. After they identify the card they have tell them to find the shape in the room and go to that area next.
Question to Guide Learning:
What shapes do you see in the classroom?
What shapes can you make with your hands?
Where is the matching shape?
What shape is on the card?
Teaching Colors
Teaching Colors
Ages: 2-3
Materials:
Small Plastic Balls (Found in Ball Pits)
5 Red Balls
5 Yellow Balls
5 Green Balls (etc)
Colored Buckets (write the color’s name on the bucket)
1 Red Bucket
1 Yellow Bucket
1 Green Bucket (etc)
Procedure:
You can make your own bucket with coffee cans, small boxes, empty formula cans, or milk jugs. Paint or use construction paper to make each bucket a different color that matches the balls. Write the name of the color on each bucket with either black paint or black sharpie. Also you can write the name of the color on the plastic balls with black sharpie.
Have the child sort the colored balls into the same colored buckets. Start with a basket full of balls and empty buckets. Take one ball out of the basket at a time and put it in the matching bucket.
Pick up Red ball and say “This is a red ball, can you find the red bucket?”
Continue with a different color until all of the balls are out of the basket or bag and into the buckets.
Extra Learning:
After the child has learned their colors have them count the balls as they put them in. Start with them learning the colors before you introduce counting the balls. Saying out loud “1 red ball, 2 red balls, 3 red balls” Have the same number of balls for each color.
Objective:
By sorting the colored balls into the matching colored buckets, the child will learn to recognize their colors and the difference in colors.
Developmental Goals:
To enhance color recognition
To promote matching skills
To promote observation skills
To enhance matching ability
Teaching Shapes
Teaching Shapes
Ages: 1-3 years old
Materials:
1. Blank paper
2. Crayon or Marker
Procedure:
Draw a circle on a piece of paper. Give a blank piece of paper to the child and have one for yourself. Say CIRCLE over and over again and keep drawing circles on the paper your piece of paper. Encourage them to draw a circle on their paper with their crayon while saying circle so they know what shape you are drawing.
After drawing millions of circles give them a new piece of paper and have them continue to draw circles. The more repetitive you are the more they will learn. Have them do their shapes after breakfast in the morning around the same time every day. Do the same shape for a couple days until they learn the shape.
After they learned the shape do a new shape. If you have a shape chart, start with the shapes that are on the chart. After their morning shape drawing activity ask them to find the shape on the chart. If they can point to the right shape then they have learned to recognize the shape.
Extra Learning:
During bath time, with bath crayons draw the shape of the day the same way you would on the paper. Draw as many “circles” as you can around the entire bath tub. This will give an extra learning activity they can do in the bath tub. Making bath time a learning experience. Let them have their own bath crayons so they can trace your circles or draw their own.
Objective:
By seeing the shape and hearing the same shape over and over, the child will learn how to create the shape themselves, recognize the shape, and name the shape.
Developmental Goals:
Recognizing and creating shapes
To promote awareness of shapes
To enhance fine motor skills
To enhance hand eye coordination
Snack Ideas
Peanut butter crackers with raisins on top
Apples and Peanut butter or Yogurt
Graham Crackers with peanut butter and mini chocolate chips or bananas
Fried Bananas
Chex Mix, Pretzels, Raisins, Make your own Trail Mix
Fruit Salad
Popcorn
Rice cakes with peanut butter
Granola Bars and Yogurt
Apples and Peanut butter or Yogurt
Graham Crackers with peanut butter and mini chocolate chips or bananas
Fried Bananas
Chex Mix, Pretzels, Raisins, Make your own Trail Mix
Fruit Salad
Popcorn
Rice cakes with peanut butter
Granola Bars and Yogurt
